

How To Set Server Resource Pack
![]()
![]()
Contents
- i Preface
- one.ane What Non to practice
- 2 Getting started
- 2.1 Making a resource pack
- two.2 Tools
- 2.ii.1 File archiver
- 2.2.two IDE
- 2.ii.3 Audio editor
- 2.two.iv Image editor/3D modeling tool
- 3 Creating a resource pack
- 3.1 Creating the folder
- 3.two Creating a .MCMETA file
- 3.iii Formatting pack.mcmeta
- 3.iii.1 "pack_format"
- 3.3.1.1 "description"
- 3.3.one.ii Correct syntax
- 3.iii.1 "pack_format"
- three.iv Testing your pack
- iii.4.i Troubleshooting
- 3.5 Pack icon
- iv Adding content
- 4.i Structuring the avails folder
- 4.ane.1 Calculation a namespace folder
- four.2 Accessing the vanilla resource
- 4.three Modifying an entity's texture
- 4.three.i Finding the vanilla texture
- 4.3.1.1 Pack hierarchy
- 4.three.i Finding the vanilla texture
- four.4 Modeling blocks and items
- four.4.1 Replacing a block
- iv.4.2 Modeling the ladder - Blockbench
- four.four.iii Texturing the ladder - paint.net
- iv.4.4 Finishing off
- iv.5 Changing existing sounds or music
- 4.5.1 Finding a audio's path
- iv.five.2 Modifying the sound
- 4.5.3 Testing your sound
- 4.six Adding new sounds or music
- 4.6.1 Finding the sound path
- 4.6.2 Adding the folders and sound in your resource pack
- 4.6.3 Changing the sound event
- 4.6.iv Testing your sound
- iv.7 Calculation languages
- four.viii Animation properties
- iv.9 Texture properties
- 4.10 Fonts
- 4.i Structuring the avails folder
- v Testing your resource pack
- 6 Packaging resource packs with worlds
- 7 Server resource packs
- eight References
Preface [ ]
Resources packs allow users to include files that can modify or add custom textures, models, animations, music, sounds, user interfaces, and languages that change the style some things in Minecraft comport or expect.
What NOT to exercise [ ]
There are some things that you lot should Not exercise when creating a resources pack / texture packs, which includes merely is non limited to:
- Anything that violates the Minecraft EULA.
- Release files that let users to play a release of Minecraft without having purchased it from Mojang.
- Release the decompiled source lawmaking of Minecraft in any way.
In any case, you should always follow the Terms and Conditions on the Mojang Studios website.
It is also suggested that yous never excerpt game files to your desktop, every bit it tin consequence in technical issues.
Getting started [ ]
Making a resources pack [ ]
Minecraft has a unique mechanic that allows for text and media files to be added to the game files that permit for everything from custom block textures and models to custom credits and sound events. This tutorial is meant to help with setting up the file systems in order to implement them. Since the files are essentially code, there are technical rules for how to format files and certain things may change from version to version. As such, what is written in this tutorial may not apply to every state of affairs, simply in the instance where the difference is meaning and specific, it provides a framework on the changes needed for different versions.
This tutorial is geared toward the latest release of Minecraft, which is currently ane.19
{ "pack": { "pack_format": 9, "description": "My Resource Pack" }, "language": { "LANG_COUNTRY": { "name": "My Custom Language", "region": "State/Region name", "bidirectional": faux } } } Tools [ ]
Creating custom files for Minecraft, whether in the forms of resources/data packs or mods, is somewhat technical and tin can exist difficult. There are many rules that must exist followed in order for add-ons to work correctly, most notably how the files are formatted. There are many tools that can help mitigate these issues, some of which are listed hither.
File archiver [ ]
To access the base assets of Minecraft to edit textures, models, or sounds, a file archiver is needed. seven-Aught or WinRAR are suggested. MacOS has a built-in file archiver called "Archive Utility" that can be used, merely if an alternative is wanted, The Unarchiver also works.
IDE [ ]
Making a resource pack involves creating JSON text files, which can be catchy to use and format correctly. Many IDEs (Integrated Development Environment) help with formatting these files and making sure proper syntax is used, as well as aid organizing files in a project. Hither are some suggestions:
- Notepad++ - A very lightweight IDE. very easy to use
- Atom – Suggested for those new to IDEs. Very easy to prepare upwardly a project folder and stay organized.
- Visual Studio Code – More than circuitous IDE improve suited for those who have feel with working in IDEs.
- jsonformatter.org - an online JSON formatting
Audio editor [ ]
In order to add sound files, you must put it in the proper format (.ogg). While this can be washed using i of numerous sites online, an audio editor plan is suggested to allow customizing or trimming of sound files. Audacity is one of the most popular sound editors.
Image editor/3D modeling tool [ ]
To add textures or custom models, it is suggested to apply a modeling program that allows for a visual-based editing system. Similar with audio conversion websites, there are many online tools, though a common recommended program is Blockbench. Most image editors suffice to alter textures, only information technology is recommended to apply an editor that supports transparency such as paint.net or https://pixlr.com/ so that you may add transparent pixels to textures.
Creating a resource pack [ ]
All the resources and instructions in a pack reside in the pack binder, which lives in the "resourcepacks" directory. You may wish to employ an IDE to help go along track of the files within your resources pack if in that location are multiple.
In versions 1.xi and higher, all file names within a resource pack should utilise lowercase letters only.
Creating the folder [ ]
The starting time affair we need to practice is create the folder that contains all the resource pack files. Create a binder on your desktop or another easily attainable location and proper noun it Tutorial_Resource_Pack. This eventually becomes the name displayed in the resource pack menu.
Creating a .MCMETA file [ ]
Within your resource pack folder, we need to create a pack.mcmeta file. This lets Minecraft know that the binder is a resources pack and contains useful information such every bit:
- The recommended version for the resource pack.
- The description displayed under the pack championship in the option menu.
- Preliminary information on whatever custom languages added in the resources pack.
To create this file, we need to create a text file inside the folder and proper noun it pack.mcmeta . Make sure the file extension is .mcmeta and not .txt or the pack may not be detected. When renaming yous may get a warning that changing a file name extension could make the file unusable or may switch the plan required to open it. You can nonetheless open this file in a text editor by right-clicking the file and selecting the "Open With" pick. Note: You may demand to select a programme using your file browser.
Formatting pack.mcmeta [ ]
Open pack.mcmeta in a text editor or IDE of your choice and blazon or copy+paste the post-obit:
{ "pack" : { "pack_format" : ix , "clarification" : "Tutorial Resources Pack" } } "pack_format" [ ]
The value of "pack_format" tells Minecraft what release the resources pack is designed for, and is different for certain versions. The post-obit list what versions each value is associated with:
-
onefor versions 1.6.1 – 1.eight.9 -
2for versions one.9 – i.ten.2 -
3for versions 1.11 – one.12.ii -
4for versions ane.xiii – 1.fourteen.4 -
5for versions 1.fifteen – 1.16.i -
6for versions 1.sixteen.2 – i.16.5 -
7for versions ane.17.x -
8for versions 1.xviii.10 -
ninefor versions 1.nineteen.x
Note: As more updates are released, values may be changed or added.
"description" [ ]
The text following "description" is displayed under the pack title in the pick menu, and must be put inside quotes "". If you wish to use special characters, you can enter the Unicode lawmaking for the graphic symbol in the format \u####, where #### is the Unicode hex code for the character. Say you desire to utilize the letter ß, which has code U+00DF. Inside the description you lot would blazon \u00DF. Make certain that you are using the correct slash, or information technology may not work. A list of Unicode codes can be found hither. Note: Only the characters 0000–FFFF (Basic Multilingual Plane) are supported. [ citation needed ]
Correct syntax [ ]
Be very careful not to forget quotation marks "", colons :, braces {}, or foursquare brackets []. Missing one of these can atomic number 82 to your resource pack not being detected past Minecraft. Make sure that your pack.mcmeta file matches the one shown above.
Testing your pack [ ]
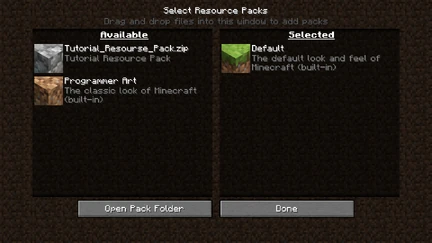
If your resources pack is formatted correctly, information technology should appear in the selection menu like this.
At this point, you can test if the pack is formatted correctly past putting it in the game! To practice this you lot must place your resource pack folder in the Minecraft pack folder. Yous tin can access it past selecting "Options", then "Resources Packs", then "Open Pack Folder", or you tin navigate to information technology from your file browser:
- For Windows, right click on the outset button → run → type in %appdata% → .minecraft → resourcepacks
- For MacOS, go to Library → Application Support → minecraft → resourcepacks
- For Linux, go to ~/.minecraft/resourcepacks (/abode/<username>/.minecraft/resourcepacks)
In one case you have the binder open, you lot can elevate your custom pack folder and drop it in.
If you lot have formatted the files correctly, yous should encounter your resource pack appear in the menu.
Troubleshooting [ ]
If you don't see your pack in the list, brand sure your pack.mcmeta file is correct and saved in the folder. Await for whatsoever missing braces {}, commas ,, colons :, quotation marks "", or square brackets []. Remember that for each open caryatid, quotation, or square bracket, you must have a closing brace, quotation, or square bracket.
Pack icon [ ]
If an icon is not specified, a asphalt icon appears next to the pack. If you lot desire to use your own pack icon, you tin can identify it inside your resources pack binder with the name pack.png. The file must be a PNG, and works with any square resolution, but a 128x128 pixel image renders the all-time.
Adding content [ ]
Structuring the assets binder [ ]
Now that y'all have your resource pack ready, y'all can start adding content to it. You add together most files into a subfolder called avails. Simply create a new folder inside your resource pack binder named assets. This, pack.mcmeta, and pack.png should be the only files located straight in your parent resources pack folder. Any other resources files must exist located somewhere in assets or they won't be read by Minecraft.
Adding a namespace folder [ ]
Next, inside your assets binder are your namespace folders. These aid carve up the files in your resource pack so that at that place is no confusion between which files are located where. If you plan on modifying or replacing vanilla resources, those files would go into the minecraft namespace folder. Custom additions should go in your own namespace folder, which for this tutorial is named custom. In the futurity, you should use a significant or unique namespace so that there isn't a possibility of other resource packs disruptive which files belong where when multiple packs are loaded.
Accessing the vanilla resource [ ]
If you plan on editing multiple resources, or to help ease of access, you lot may want to salvage a copy of the vanilla resources in an accessible location in case some things rely on other files inside the directory. To exercise this, yous need to navigate to the vanilla resources file by opening the versions folder inside the .minecraft directory. You should see a list of numbered folders, which correspond to versions that you've loaded or used in the by. Open the folder corresponding to the version you desire for your resource pack (in this tutorial information technology would exist 1.19) and excerpt the JAR file located within, which can be done by right clicking the file and selecting a file archiver from the "Open up With" option. Yous may want to save this in an attainable location for future reference, as certain tasks such as modifying cake models require textures in improver to the model files. If you do not have a program that tin can open .jar files simply change the extension from .jar to .aught.
Modifying an entity's texture [ ]
This section goes through the process of modifying a texture, using the creeper texture as an case.
Finding the vanilla texture [ ]
Showtime, you need the vanilla resource to get the texture you want to edit. This is located in the extracted version folder that was created in the previous department. In the extracted folder, navigate to assets→minecraft→textures→entity→creeper where yous tin find creeper.png. Save a duplicate of this file somewhere accessible or keep the binder window open up during the adjacent few steps.
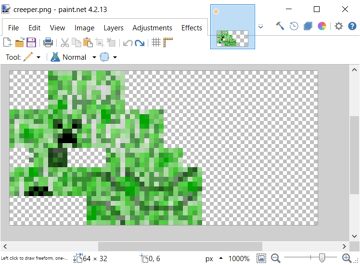
The creeper texture loaded in paint.net
Next you'll need to replicate the folder structure of the vanilla pack within your resources pack, which lets Minecraft know to utilize the texture. Since nosotros are modifying a default texture, this is in the minecraft subfolder of our assets folder. Within the minecraft folder of your resource pack, exercise the following:
- Inside
minecraft, create a folder calledtextures. - Within
textures, create a folder calledentity. - Inside
entity, create a folder calledcreeper. - Copy the creeper texture from the vanilla resource pack into your newly created
creeperbinder.
At present that y'all have the normal creeper texture placed in your resource pack, open up information technology up in the prototype editor of your choice. It should look something like the image shown.
Since texture files are very minor, you may demand to zoom in.
- A quick note on textures
If you've never seen a texture before, the higher up image might surprise y'all. A lot of textures expect this way and are "wrapped" around a model, similar wrapping paper around a nowadays.
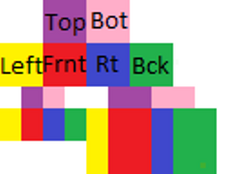
Colour-coded Texture. Sections of the same color e'er confront the same management.
Now it'due south time to be creative! Edit the texture notwithstanding you desire. For simplicity, this example adds a headband. Notation where the changes are and compare information technology to the colour-coded texture to a higher place.
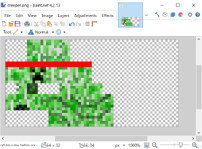
Creeper texture with a red headband.
In one case y'all are happy with your texture, relieve the file equally creeper.png. It is of import that it is saved with the same name as the default asset or otherwise it cannot observe and load your texture.
Now you tin can load up Minecraft and spawn a creeper with your custom texture! If it doesn't show upwardly, brand sure that y'all've selected your resources pack. If it still doesn't work, brand sure you've named the file properly and placed it in the right folder.
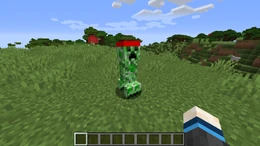
Here's the creeper with the new texture as it appears in-game.
Pack hierarchy [ ]
If you lot are playing with multiple resources packs loaded, at that place may be some textures that are in your pack that aren't being shown. This is considering of the style resource packs are loaded in Minecraft. All selected resource pack files are loaded from the lesser up as they are shown in the option menu, and so if there is a resource pack that is loaded in a higher place yours, it may supersede files that you've changed. This tin cause various issues with using multiple themed resource packs that accept differing textures.
Modeling blocks and items [ ]
Sometimes you may desire to modify one of the Minecraft models. To practice so y'all need a file archiver to get the default model and texture along with a 3D modeling tool to edit the model. Blockbench works well in this instance since it can export direct to the .json format needed for models.
Replacing a block [ ]
Considering the default ladder in Minecraft isn't 3D, you can replace it with your ain model. Outset, get all the ladder's files into this resource pack:
- Open up the Minecraft JAR file using a ZIP viewer of your choice.
- Navigate into the
assets/minecraft/blockstatesbinder, and so excerptladder.jsontoTutorial_Resource_Pack/assets/minecraft/blockstates - Navigate into the
avails/minecraft/models/blockfolder, then excerptladder.jsontoTutorial_Resource_Pack/assets/minecraft/models/cake - Navigate into the
avails/minecraft/models/detailfolder, and then excerptladder.jsontoTutorial_Resource_Pack/assets/minecraft/models/item - Lastly, navigate into the
assets/minecraft/textures/cakefolder, and so extractladder.pngtoTutorial_Resource_Pack/avails/minecraft/textures/cake.
Now yous can either edit the ladder.png using your preferred epitome editor, or you can edit it in your preferred modeling editor.
Note: If you are doing a basic "Simply Simple Nonanimated Textures" resources pack, the .json files are unnecessary. Otherwise, if you are doing special features to change what the texture looks like when certain parameters are true or false, then the .json files would exist necessary. For example, if you created a resource pack that makes grass blocks smooth, the .json files would prevent yous from having dirt lines everywhere in your world that already uses code.
Modeling the ladder - Blockbench [ ]
In modeling the ladder, nosotros use Blockbench. Once you lot have opened the plan, press Ctrl+O to open up the model choice carte du jour. After the open dialog has appeared, become to the location where you lot saved ladder.json and select .
Y'all and so should be facing a ladder that is on the south side of the box.
- On the carte du jour bar, go to "Edit -> Add Cube" to create a new block.
- Resize the model to a full-sized cube. So, under Textures on the left panel right click
ladder.png, then click Employ to Untextured Faces. - In the top left, there is an image of the ladder, with a one×1 highlighted region. Move this to change the texture to what you desire information technology to be. Repeat until all sides of the block are every bit wanted.
- Go to "File -> Save Model" and relieve in
resourcepacks/Tutorial_Resource_Pack/assets/minecraft/models/block/ladder.json(Replace "block" with "blocks" for ane.12 and below).
Now we have created a new model for the ladder cake in Blockbench.
Texturing the ladder - paint.net [ ]
Go to getpaint.net and get pigment.internet or become to ninite.com, select paintNET and run information technology after it downloads to install paint.net for free.
- Open paint.internet.
- Do Ctrl+O and go to .minecraft/textures/block/ladder.png and double click.
- Edit the Ladder however you lot desire.
- When you're done, press the X push in the top right of the window. It opens a dialog if y'all changed annihilation and inquire if you want to save your work. Press Save and then okay twice. You don't need to change anything in the menus.
Finishing off [ ]
When you accept completed the 3D model of the ladder and saved it, launch Minecraft, and test information technology out. Place a ladder on a wall, and you should see its replaced model.
Changing existing sounds or music [ ]
This department is missing information about Changing subtitles of sounds, adding subtitles to existing sounds without them.
Please expand the department to include this information. Further details may exist on the talk page.
Merely like modifying the default textures or models, you tin can substitute custom sounds in place of the default ones. This case shows how to modify the boss music in the ender dragon fight.
Finding a sound's path [ ]
Similar to the custom texture and models, you'll first need to know the path of the sound yous desire to alter.
- Inside your .minecraft folder, navigate to
assets/indexes, which contains a listing of numbered.jsonfiles. - Find the
.jsonfile respective to your Minecraft version (e.g.1.16.json), and open information technology with a text editor or IDE. - In this file you tin discover all the sounds institute in Minecraft. Printing CTRL +F to search for your sound.
- For a list of filenames for music, you tin check Music#List
- Your sound path should look something similar this:
minecraft/sounds/music/game/end/boss.ogg
Modifying the audio [ ]
- Inside your resource pack folder, navigate to
avails/minecraft. - Create a new folder named
sounds. - Now within your
soundsbinder, you need to create new folders depending on your sound's path. For case, if your path isminecraft/sounds/music/game/end/boss.ogg, y'all need to create the folderssounds/music/game/end. - In the terminal folder (in this example, information technology's
end) you can put in your new sound file. Make certain you named the file to the file that you're replacing, or in this example,boss.ogg.- Note that this file must be a
.oggfile. To convert your sound file to a.oggfile, y'all can use the costless website Online-Convert.com
- Note that this file must be a
Testing your sound [ ]
If everything went according to plan, you have now replaced a sound in Minecraft. To test it:
- Make sure yous take enabled your resources pack.
- If you already had Minecraft open with your resource pack enabled, you tin printing F3 +T to reload all resource packs.
- Use the
/playsoundcontrol to play your sound. In our example, blazon:/playsound minecraft:music.dragon master @s
Adding new sounds or music [ ]
![]()
This section is a work in progress.
Please assist in the expansion or creation of this article by expanding or improving it. The talk page may comprise suggestions.
In improver to modifying default sounds, you can add your own! In this case, a new player hurt sound tin can be added without replacing whatsoever of the electric current player hurt sounds.
Finding the sound path [ ]
In order to add a audio, you'll demand to know where it should actually go past determining its path. Unlike replacing sounds, y'all should go direct to your resource pack folder and search in there.
- Discover and open your version's
.jsonindex file (due east.chiliadane.19.json) from.minecraft/assets/indexes. - Press CTRL +F to search for your sound path.
- In this instance, the location for the player hurt sounds looks like this:
minecraft/sounds/impairment/.
- In this instance, the location for the player hurt sounds looks like this:
Adding the folders and sound in your resource pack [ ]
- Going to your resource pack folder, navigate to
Tutorial_Resource_Pack/avails/minecraft. - Inside the
minecraftfolder, create a binder namedsounds.- If you already have a
soundsbinder from replacing a default audio, open up that folder.
- If you already have a
- Within the
soundsfolder, create a folder that matches the directory of the sound you want to add. In this instance, we are going to create a file calledharm. - Add your sound here.
- The sound must be a
.oggfile. Like in the previous section, you may apply the free website Online-Catechumen.com or use Brazenness as mentioned at the top of the page. - Also annotation the already existing files seen in your
.jsonfile from above. In this example, five other hurt sounds exist within theminecraft/sounds/damage/folder, two for falling at different heights (fallbig.oggandfallsmall.ogg) and the other three are when the actor actually gets hurt (hit1.ogg,hit2.ogg, andhit3.ogg) Since we want to add a quaternary sound to the existing three hurt sounds, nosotros cannot reuse those file names. For simplicity, name your soundhit4.ogg.
- The sound must be a
Changing the sound event [ ]
Considering we are adding a sound, we must change the associated sound result in sounds.json.
- Get back to
assets/minecraftin your resources pack folder. - Create a text file named
sounds.json. Do brand sure that the file extension is indeed .json and nothing else. - At your pick, paste the following template into
sounds.json:
{ "entity.player.hurt" : { "sounds" : [ { "name" : "damage/hit1" }, { "proper name" : "damage/hit2" }, { "name" : "damage/hit3" }, { "name" : "impairment/hit4" } ], "subtitle" : "Hurt" } } - The above code but applies to this example, which adds a new damage sound. If you lot are irresolute a different sound event, replace
entity.actor.hurtwith the audio event listed in the vanillasounds.jsonfile. - You tin find out the id used by Minecraft for each sound folder. By using
/playsoundin-game, you can determine this id. In this case, using/playsound minecraft:entity.player.injure main @southconfirms that the player's injure sound is indeed classified asentity.player.hurt. - Make sure the name fields are in lowercase characters merely. The names of your files should be in lowercase too. Otherwise, the resource pack may fail to utilise your new sounds.
- The
subtitlefield dictates the text to brandish when the audio is played. Information technology can either be a string of text, or tin employ a field defined in alangfile.[ needs testing ] - In addition to these fields displayed, you lot may add together more additional fields to the
sounds.jsonfile to specify more than parameters such equallyvolumeandpitch. A detailed list of boostedsounds.jsonfields can be institute here. - Correct
.jsonformatting is required! Any missing bracket, comma, etc. causes the resources pack to fail.
Testing your sound [ ]
If there is an error anywhere in your sounds.json file, none of the sounds described in it appear in-game. If this happens, you should cheque the spelling and file paths.
If everything went according to plan, you accept at present added a sound to Minecraft. To test information technology:
- Make sure you have enabled your resource pack.
- If you already had Minecraft open with your resources pack enabled, y'all can press F3 +T to reload all resource packs.
- Use the
/playsoundcontrol again to play your audio. In our example, type:/playsound minecraft:entity.player.hurt master @s. For this example, it probable requires multiple tries, every bit hurt sounds are chosen randomly.
Adding languages [ ]
You tin add together new languages to Minecraft using a resource pack. Assume your language code is 'LANG'[one] and country/region code is 'Country',[2] pack.mcmeta looks similar:
- pack.mcmeta
{ "pack" : { "pack_format" : 7 , "clarification" : "Tutorial Resource Pack" }, "language" : { "LANG_COUNTRY" : { "proper name" : "Tutorial Language" , "region" : "State/REGION Name" , "bidirectional" : false } } } If you desire your language to exist right-to-left, fix "bidirectional" to true.
Then, put LANG_COUNTRY.json in avails/minecraft/lang inside your resource pack. When yous launch the game, choose your resource pack, open the Language selection screen, and your new linguistic communication should be there.
- Notes
The pack.mcmeta goes in the root folder of your resource pack, not in the assets/minecraft/lang folder. As well note that the higher up pack.mcmeta is the same file as the pack.mcmeta file that you have created a while ago. As of 1.7-pre, y'all tin choose multiple resources packs at once. If you want to use your new language and resource pack for before 1.7, you need to combine them manually considering multiple resource packs could non be selected before the version.
Animation backdrop [ ]
An example of an blitheness file is this:
- rock.png.mcmeta
{ "animation" : { "interpolate" : true , "width" : one , "height" : 7 , "frametime" : 1 , "frames" : [ { "index" : 0 , "time" : 0 }, 1 , two , 3 , 4 , five , 6 , 4 , 2 ] } } - Notation
All you actually need to make a texture animated is the post-obit code. Past default, information technology makes each frame last only 1 tick:
- stone.png.mcmeta
Save the file as the same name as the texture you want to exist animated with an .mcmeta in the same folder as your texture.
Texture properties [ ]
An instance of a texture property is this:
- shadow.png.mcmeta
{ "texture" : { "blur" : false , "clench" : truthful } } Fonts [ ]
Character sizes in fonts are adamant past the final line of pixels that contains pixels that contain a non-cypher alpha. This allows additional padding to be added around characters by adding a colour with an alpha level of 1, which Minecraft considers as part of the grapheme.
Testing your resource pack [ ]
- Launch the game
- Click on Options
- Click on Resource Packs
- Observe "Tutorial_Resource_Pack" in the listing on the left and click the arrow next to information technology
- Click Washed
If you make up one's mind you want to make some changes to your resource pack, edit your resource pack, become to resource packs in options, remove your pack from the agile listing and exit, go dorsum, and reapply it. Alternatively, saving the texture to the resource pack and pressing F3 +T reloads the pack without the demand to reload the default textures start.
Packaging resource packs with worlds [ ]
For use in singleplayer worlds, you can package your resources pack as a ZIP file named resource.zip inside the world directory. This is then automatically used when playing the singleplayer world.
Server resource packs [ ]
If yous are the possessor of a server, you may set it as the resource pack of your server.
- Brand certain your pack format is a .zip-folder.
- Upload the pack on a file hosting website, e.g. MCPacks.
- Copy the download link of your pack. IMPORTANT: If you are using your ain server or some other host then you accept to make certain that y'all are using a directly download link. You also need to make sure to use a SSL document that is compatible with the shipped Java version 8 u51. (MC-143768)
- Open the server.properties with a text editor.
- Search for the line "resources-pack=".
- Paste the download link later the equal sign.
- Optional: Set the "resource-pack-sha1" hash sum of the pack file.
- Save your changes to the server-properties and restart your server.
- Relish!
Servers can have an icon that appears in the Multiplayer listing.
- Create a PNG image with a size of 64 by 64 pixels, transparency is supported.
- Save (or rename) it to
server-icon.png. - Move information technology to the server's directory.
- Restart the server.
- Server icons should display next to the server name.
References [ ]
- ↑ ISO 639
- ↑ ISO 3166-ane
Source: https://minecraft.fandom.com/wiki/Tutorials/Creating_a_resource_pack
0 Response to "How To Set Server Resource Pack"
Post a Comment